Turning a static Next.js website into editable CMS
Merry magical week of Christmas, innovators of the Internets!
0. Too Long; Didn’t Read
Who has time for these clever posts where some smarty-pants gets way too excited describing their latest ToDo-app or how they’ve re-created their blog engine? No one! PS. I’ve got super interesting posts (in Finnish only) about different blog engines I’ve used: Drupal, Scala, Play framework, Backbone.js,…😴, Gatsby. You should definitely check them out!
Anyway, let’s get a quick summary before I’ll get too excited and dive into the details:
- We’ve got a super performant static Next.js site.
- While being static it can be edited right in the browser (in a Markdown editor)
- All changes are saved to GitHub repository (giving us a nice history of all the changes)
- Next.js is awesome.
- Have I mentioned lately I might have what it takes to become a male model? 🤔
I see a bright future in front of me working as a professional broadcaster… Ain’t no joke trying to pronunciate with my lovely rallienglanti without sounding like the village idiot!
1. Background
In 2014, I made a bold move of creating a Jekyll-based website for my ~60 year-old (at the time) dad and his company Infocrea Oy. I thought teaching Markdown, Git and a few shell scripts would be easy peasy, and he’d be writing bash scripts to optimize his Markdown generation in no time! I believe this GitHub commit (August 30, 2014) was his first commit flying solo (the post is still live btw).
To be honest, he managed quite well on his own with the instructions and Jekyll plugins I created to help him. However, the Git-part always remained a bit of a mystery to him. The relationship of these three aspects never quite clicked:
- Source code (Markdown posts)
- Deployed site (
jekyll build) - Status of the Git repository
2. Getting motivated
Since retiring this year, my dad wanted a new personal website. After all, how does a seventy-year-old pensioner otherwise step up his social-media/influencer game? Tip of the hat to my pops for having the balls to offer me free visibility in his social media circles in order to “pay” for my website services… What a legend!
Needless to say, I was instantly hooked! Getting some big-time visibility in my dad’s professional web of influencing could yield some invaluable contacts!

3. Pain points of the old site
The biggest pain points for my dad in regards to the Jekyll site were understading the Git, and also working with images. In his old Jekyll blog, he mostly used my custom Flickr-based -plugin (flickr_embed.rb) to embed images from his Flickr account. Also, at times my dad accidentally edited the generated HTML-file instead of the source Markdown file.
In a nutshell, the old setup was complicated and by no means trivial to use by someone who hasn’t been coding half of his life. In retrospect, I perhaps should start working as a motivational speaker instead of an engineer — after all, I got my dad using the system for over seven years. Think about it: this guy was born in the Fifties, and the poor bastard was suckered into running shell scripts from the terminal, and editing Markdown files in his Sublime text editor… 😅
4. Dawn of a new time
Now, the question is — how can we build a new site that makes EVERYTHING easier. Ladies and Gentlemen, let me show you the light!
- The solution I’ve created uses a static pre-generated website, built with Next.js.
- It is deployed to Vercel’s cloud.
- Images are stored in Cloudflare Images, and can be uploaded/selected right in the browser.
- All pages are MDX files with a set of helpful components available;
such as
Picturecomponent that wraps next/image with additional styling/caption support. - Login endpoint authenticates my dad, and enrichens static pages with edit functionalities. The enhansing is done fully on the client-side.
- MDX files are previewable right in the browser.
- With a simple click of a button the previewed page is published to GitHub, which then in turn deploys a new version of the website to Vercel.
That’s it! With this solution, my dad can update his website dynamically right in the browser – without ever leaving his site! In addition, we get the benefit of all posts being in the GitHub repository with nice commit history. OH YEAH! Can I get a Hallelujah!
Next, let’s go through these afore-mentioned mechanisms in more detail.
5. Authentication
The first step was to enhance the statically built website with some editing capabilities, that should only be
visible to a logged-in user. This was be done by adding a POST /api/login API endpoint.
import type { NextApiRequest, NextApiResponse } from 'next'
import jwt from 'jsonwebtoken'

const isValidCredentials = (username: string, password: string) =>
  username === process.env.LOGIN_USER && password === process.env.LOGIN_PASSWORD

export default (req: NextApiRequest, res: NextApiResponse) => {
  const { username, password } = req.body

  if (isValidCredentials(username, password)) {
    const token = jwt.sign(
      { username },
      process.env.JWT_SECRET as string,
      { expiresIn: '7d' }
    )
    res.status(200).json(token)
  } else {
    res.status(403).send('Invalid credentials')
  }
}
On the client-side, we can then store the JWT-token (returned from the /api/login endpoint) into the session storage.
And then we’ll have client-side logic that adds the editing options once a valid JWT-token is available.
Again, all the pages are still static and highly performant.
import React from 'react'
import { useRouter } from 'next/router'
import { determineGitHubSourcePathFromUrl, doesUserHaveValidJwtTokenInSessionStorage } from '@/lib/utils'

// We can include AdminFeaturesBar in our layout.
// It'll add a red Admin-bar for logged-in users (rendered only on client-side)
const AdminFeaturesBar = () => {
  const router = useRouter()
  const [sourceFile, setSourceFile] = React.useState<undefined | string>(undefined)

  React.useEffect(() => {
    setSourceFile(determineGitHubSourcePathFromUrl(router.asPath))
  }, [])

  const isUserLoggedIn = () =>  doesUserHaveValidJwtTokenInSessionStorage()

  // We check for `window` to make sure the statically built pages do not include the admin-bar;
  // also `isUserLoggedIn` utilizes `window.sessionStorage` so it has to be done on client-side
  return (typeof window !== 'undefined' && isUserLoggedIn()) ? (
    <div className="AdminFeaturesBar">
      <div className="AdminFeaturesBar-title">ADMIN FEATURES:</div>
      <ActionLinks sourceFile={sourceFile} />
    </div>
  ) : null
}
6. Editing content right in the browser
Next step was to add the Markdown/MDX editor to the website. I used Monaco Editor for this purpose. We utilize GitHub Contents API endpoints for fetching and updating pages (via Git commits).
First of, let’s look at an example that fetches the existing MDX source code from the GitHub API:
import type { NextApiRequest, NextApiResponse } from 'next'
import { Base64 } from 'js-base64'
import jwt from 'jsonwebtoken'

const validateApiRequest = (req: NextApiRequest, res: NextApiResponse) => {
  const { authorization } = req.headers
  if (typeof authorization === 'string') {
    const jwtRes = jwt.verify(authorization.replace(/^Bearer /g, ''), process.env.JWT_SECRET as string)
    if (typeof jwtRes === 'string') {
      res.status(401).send(jwtRes)
      return false
    } else {
      return true
    }
  } else {
    res.status(403).send('Forbidden')
    return false
  }
}

export default async (req: NextApiRequest, res: NextApiResponse) => {
  if (validateApiRequest(req, res)) {
    const { page } = req.query
    const { GITHUB_ACCESS_TOKEN, GITHUB_REPO } = process.env

    const githubResponse =
      await fetch(`https://api.github.com/repos/${GITHUB_REPO}/contents/${encodeURIComponent(page as string)}`, {
        method: 'GET',
        headers: { Authorization: `Bearer ${GITHUB_ACCESS_TOKEN}`, 'Content-Type': 'application/json' }
      })

    if (githubResponse.ok) {
      const json = await githubResponse.json()
      const content = Base64.decode(json.content)
      res.status(200).send({ ...json, content })
    } else {
      res.status(400).send(await githubResponse.json())
    }
  }
}
This uses a GITHUB_ACCESS_TOKEN environment variable that is a
personal GitHub access token of my dad’s.
7. Preview MDX (rendered into HTML)
Next step was to add the ability to preview MDX source files. This was perhaps the trickiest part of our solution.
I am using HashCorp’s next-mdx-remote for rendering MDX, and we need to have
a separate getStaticProps where we serialize the MDX formatted string into a MDXRemoteSerializeResult. What I ended up doing is having two endpoints:
POST /api/github/create-temporary-gistendpoint for saving the source MDX into a temporary Gistpages/admin/gist/[gistUrl].tsxdynamic page for rendering the temporary gist into HTML
// Use some constants to identify our programmatically created temporary gists
// These variables are used in functions `deleteAutoGists` & `createGist`
const AUTO_DESCRIPTION = 'JarmoLahti.fi temporary auto-gist'
const AUTO_FILENAME = 'content.mdx'

export default async (req: NextApiRequest, res: NextApiResponse) => {
  const content = req.body
  if (validateApiRequest(req, res) && typeof content === 'string') {
    const token = process.env.GITHUB_ACCESS_TOKEN as string
    // 1. Utilize https://api.github.com/user to get the login of the used GitHub account.
    // We could hard-code this, but better to make it configurable
    const login = await gitHubLogin(token)

    // 2. Utilize https://api.github.com/users/${login}/gists to delete old temporary gists,
    // as we don't want to keep piling up some temporary Gists in my dad's profile
    const deletePromise = deleteAutoGists(login, token)

    // 3. Utilize https://api.github.com/gists to create a new Gist
    const gist = await createGist(token, content)

    const gistRawUrl = (gist as any).files[AUTO_FILENAME].raw_url as string

    deletePromise.then(values => {
      console.debug(`Deleted ${values.length} existing gists`)
    })

    res.status(200).send({ gistRawUrl })
  }
}
Now that the temporary MDX file is stored in a temporary Gist, in the Preview-view we can simply show an iframe
that shows the content of the dynamic page that renders the MDX into HTML:
import { MDXRemote, MDXRemoteSerializeResult } from 'next-mdx-remote'
import { serialize } from 'next-mdx-remote/serialize'
import mdxComponents from '@/components/mdx'

type Props = {
  mdxSource: MDXRemoteSerializeResult
}

const AdminPreviewPage = ({ mdxSource }: Props) =>
  <MDXRemote {...mdxSource} components={mdxComponents} />

export default AdminPreviewPage

type Params = { params: { gistUrl: string } }

export async function getStaticProps({ params }: Params) {
  const content = await fetch(params.gistUrl).then(res => res.text())
  const mdxSource = await serialize(content.replace(/^---([\n\r]|.)*---/m, '').trim())

  return { props: { mdxSource } }
}

export async function getStaticPaths() {
  return { paths: [], fallback: 'blocking' }
}
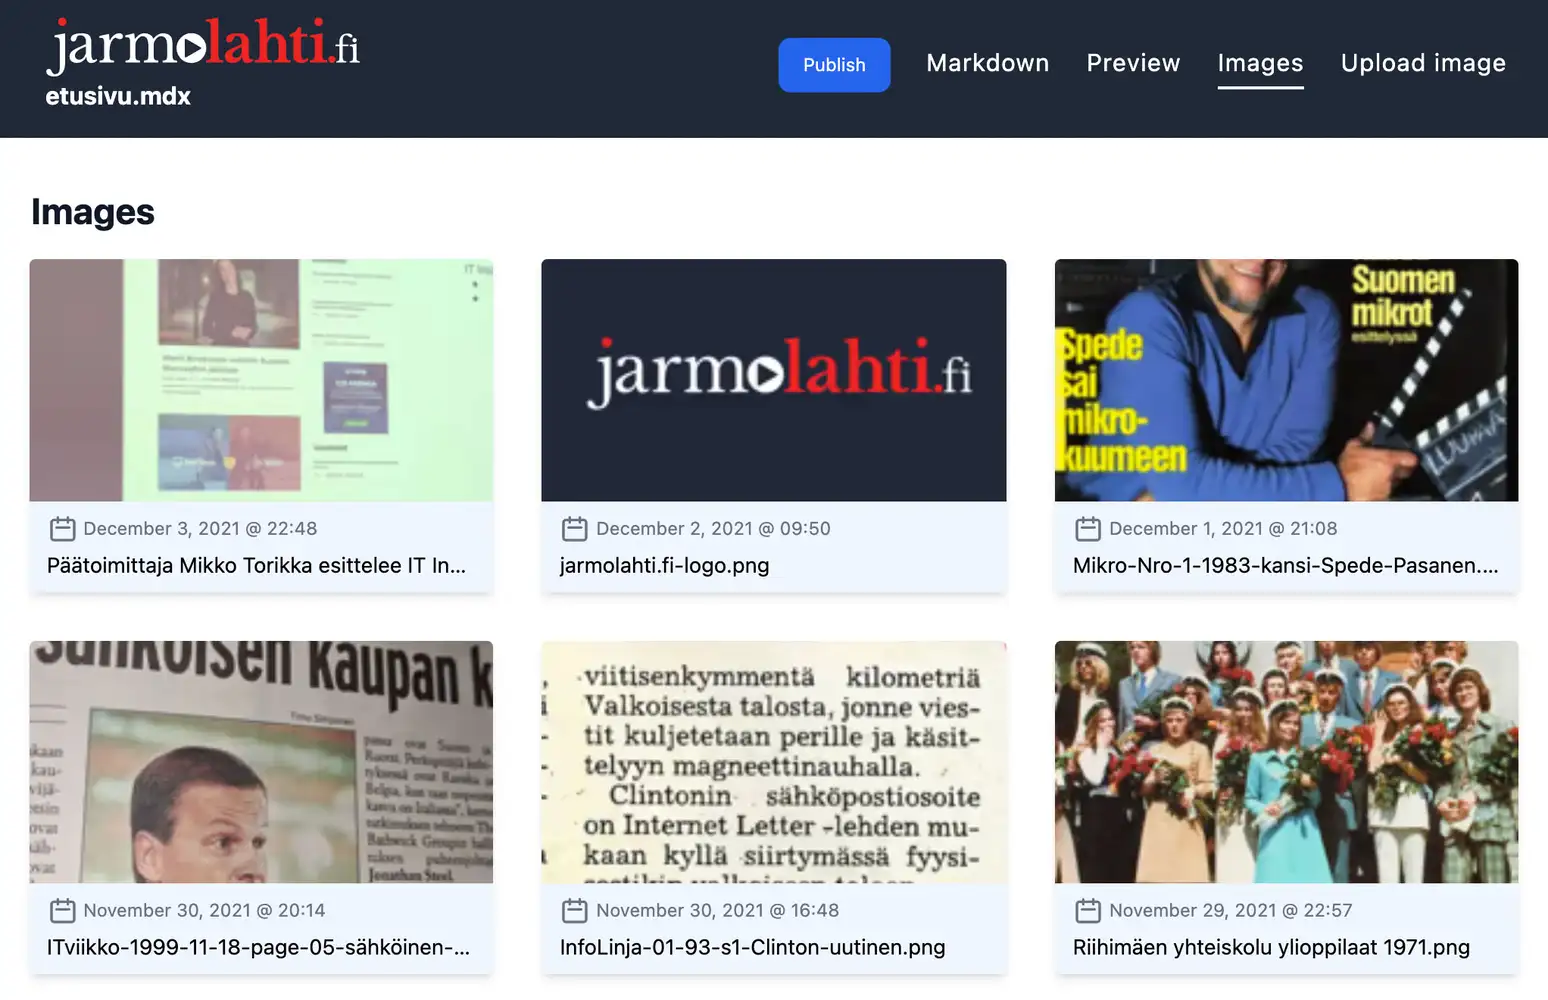
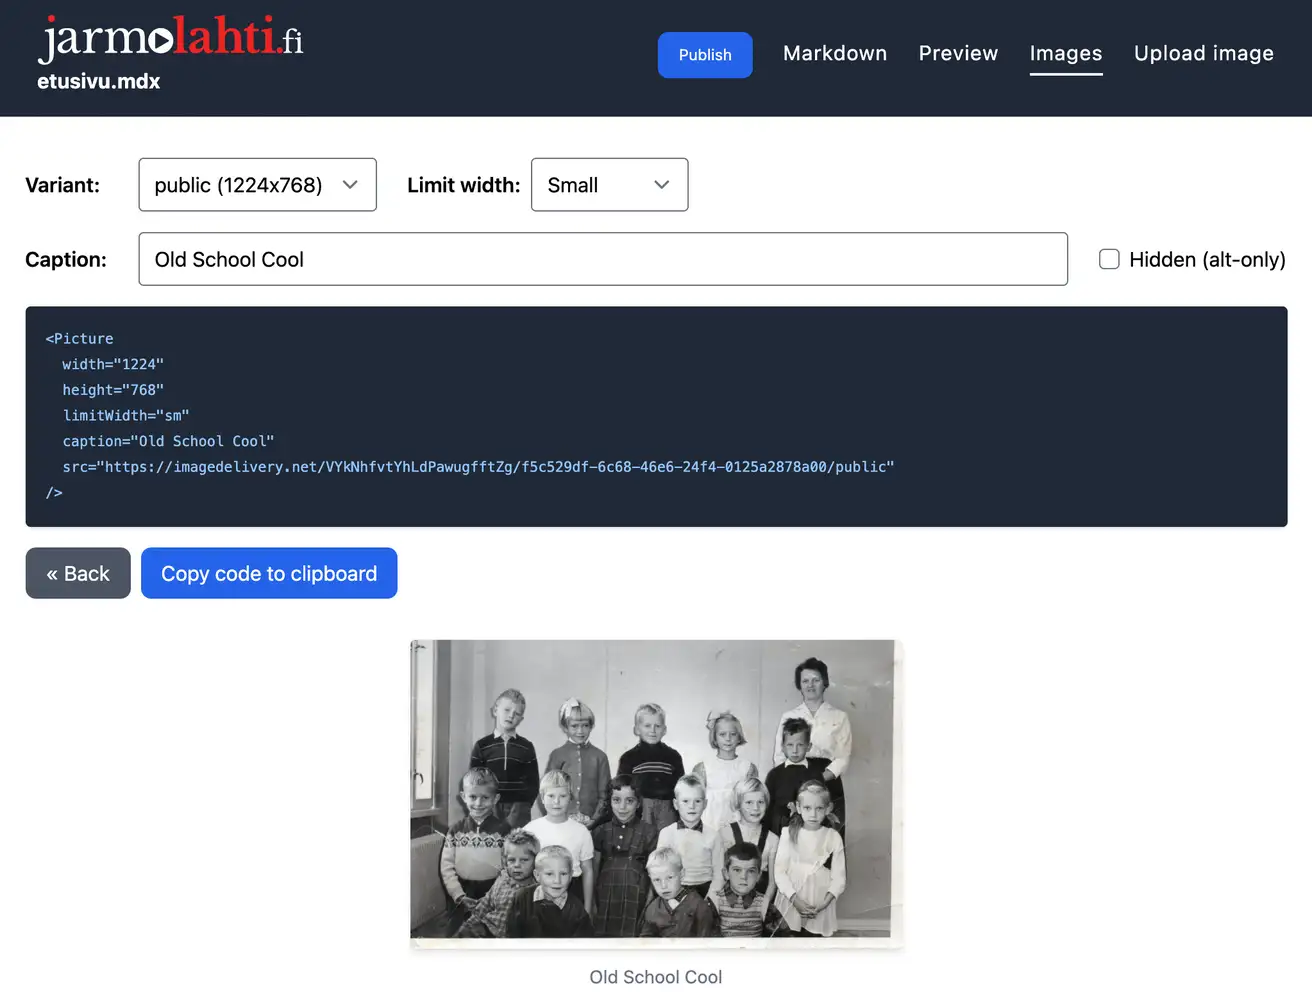
8. Image support
Last must-have feature for creating coherent content was the ability to include images easily. This requirement has multiple parts:
- Easily add new images
- See available images
- Easily include images into posts and pages
We will utilize Cloudflare Images for uploading images and listing those. However, this will still leave us with the problem of easily including/adding the to posts.
We could simply utilize the standard HTML img tag but the problem with that is, that it causes content to jump around while the images are lazily loaded.
Thus, we will be utilizing the next/image
component which requires width and height parameters in advance (for non pre-imported images).
Given all this, we will be creating a Admin view, where you can upload and list images from Cloudflare Images, and a code-generator that creates a custom
Picture component code as desired.
9. Summary
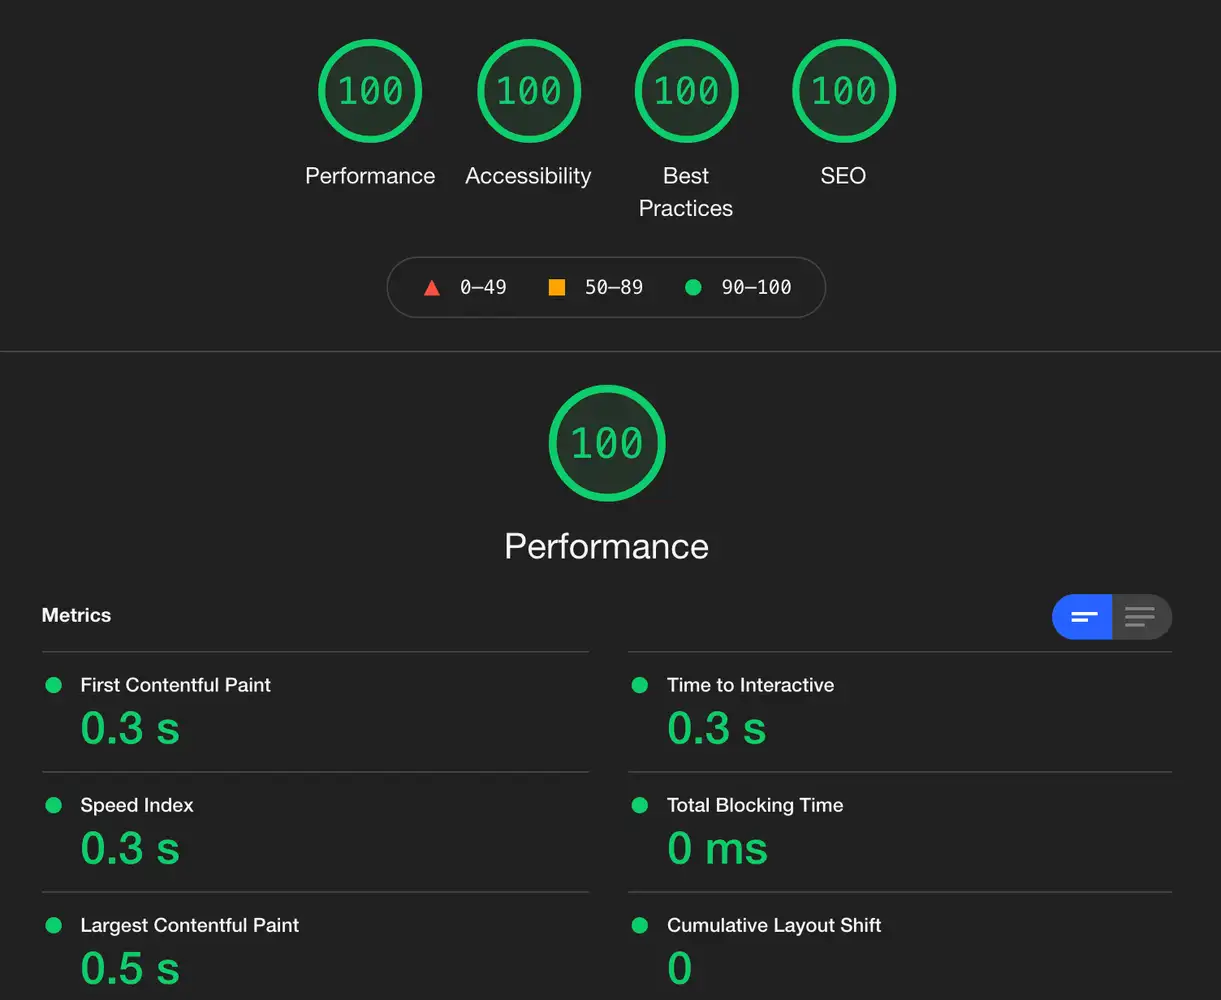
The website is live and blooming at jarmolahti.fi. And according to Google’s Lighthouse report the site is as good as they get! I might have had something to do with it. However, in all honesty, the tech stack I used made it pretty easy:
- Vercel’s cloud is fast and geographically distributed
- Next.js had a ready-made
next/imagethat loads the images lazily while preventing the cumulative layout shift from happening - Cloudflare Images are also served from a fast CDN
Let me know in the comments or Twitter if you’ve used a similar approach of having an online markdown editor that integrates with GitHub repository – essentially creating a headless CMS. I tried Googling it, but did not find anything relevant. I suppose it might be somewhat of a novel idea, but on the otherhand way too obvious for not being done by a propeller head or two! 😁

Although, if you’re technically oriented, you probably prefer working on your terminal & code editor (I know I do) — and not in some integrated editor inside the website. However, for my dad, I think this kind of a solution really hit the spot: ability to work with Markdown and images easily without having to worry about shell scripts, npm dependencies, Git conflicts and so on.
That’s all she wrote! Happy holidays & take it easy! 🎅👍
P.S. Dear Vercel, if you’re reading this feel free to contact my dad at jarmolahti.fi. I’m thinking you could easily use his good looks and crazy-ass deployment skills for targeting a whole new demographic: senior citizens willing to step up their web presence. I mean look at that jolly guy: pushing commits and making ’em deployments like a true champion. Without a care in the world!